Clear Guides & Quick FAQs to get you sorted! Welcome to our Support Hub!
It’s packed with user guides and FAQs to help you master GO! Site Ready without breaking a sweat. You’ll also get a fair dinkum idea of how our software can get your business running smoother than ever.

Strategic Alert Configuration in GO! Site Ready is a proactive move designed to monitor mandatory attainments across your people, equipment, and company records. By moving away from reactive notifications, you create a “Single Source of Truth” that identifies compliance risks before they become issues. This approach protects your bottom line by eliminating the hidden costs of non-compliance, such as emergency mobilisation fees, idle time, and “gate turn-arounds” where assets are rejected at the site entrance. You benefit from total data integrity and constant audit-readiness, ensuring that every worker and machine is site-ready before they ever leave the yard.
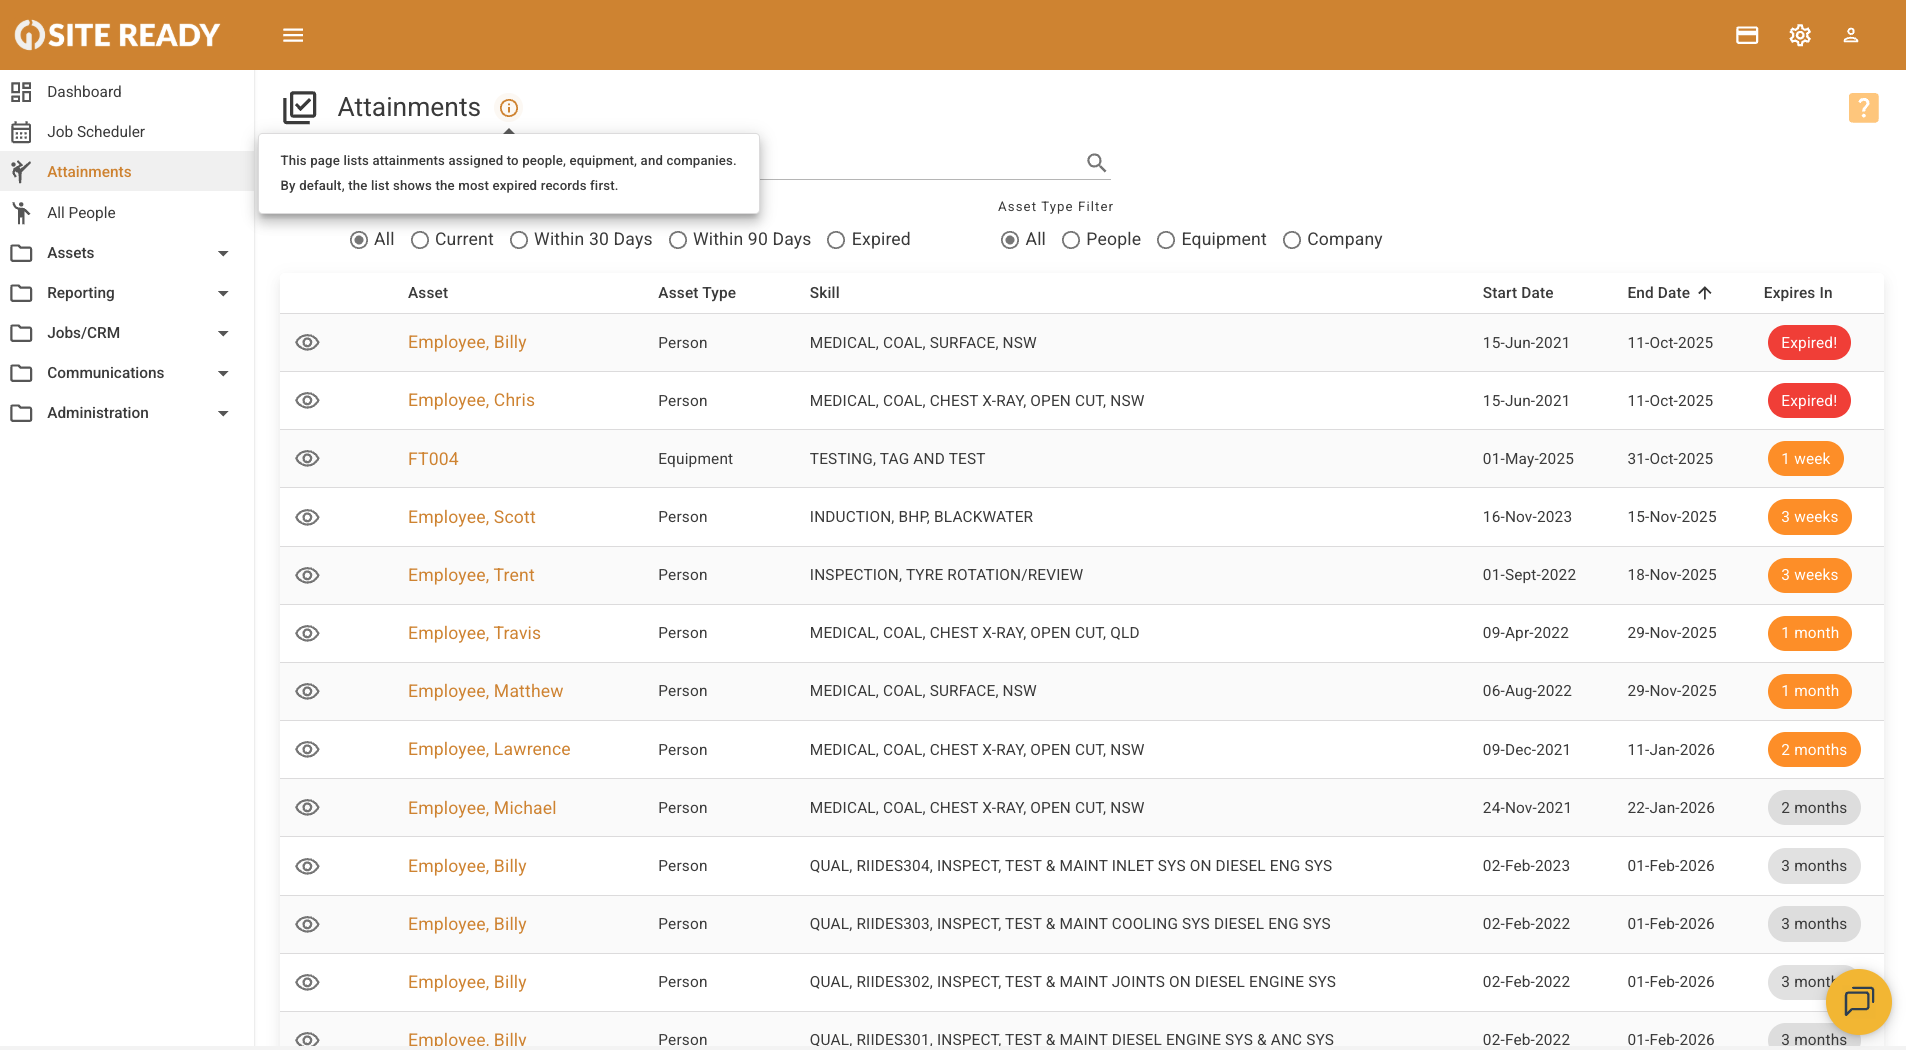
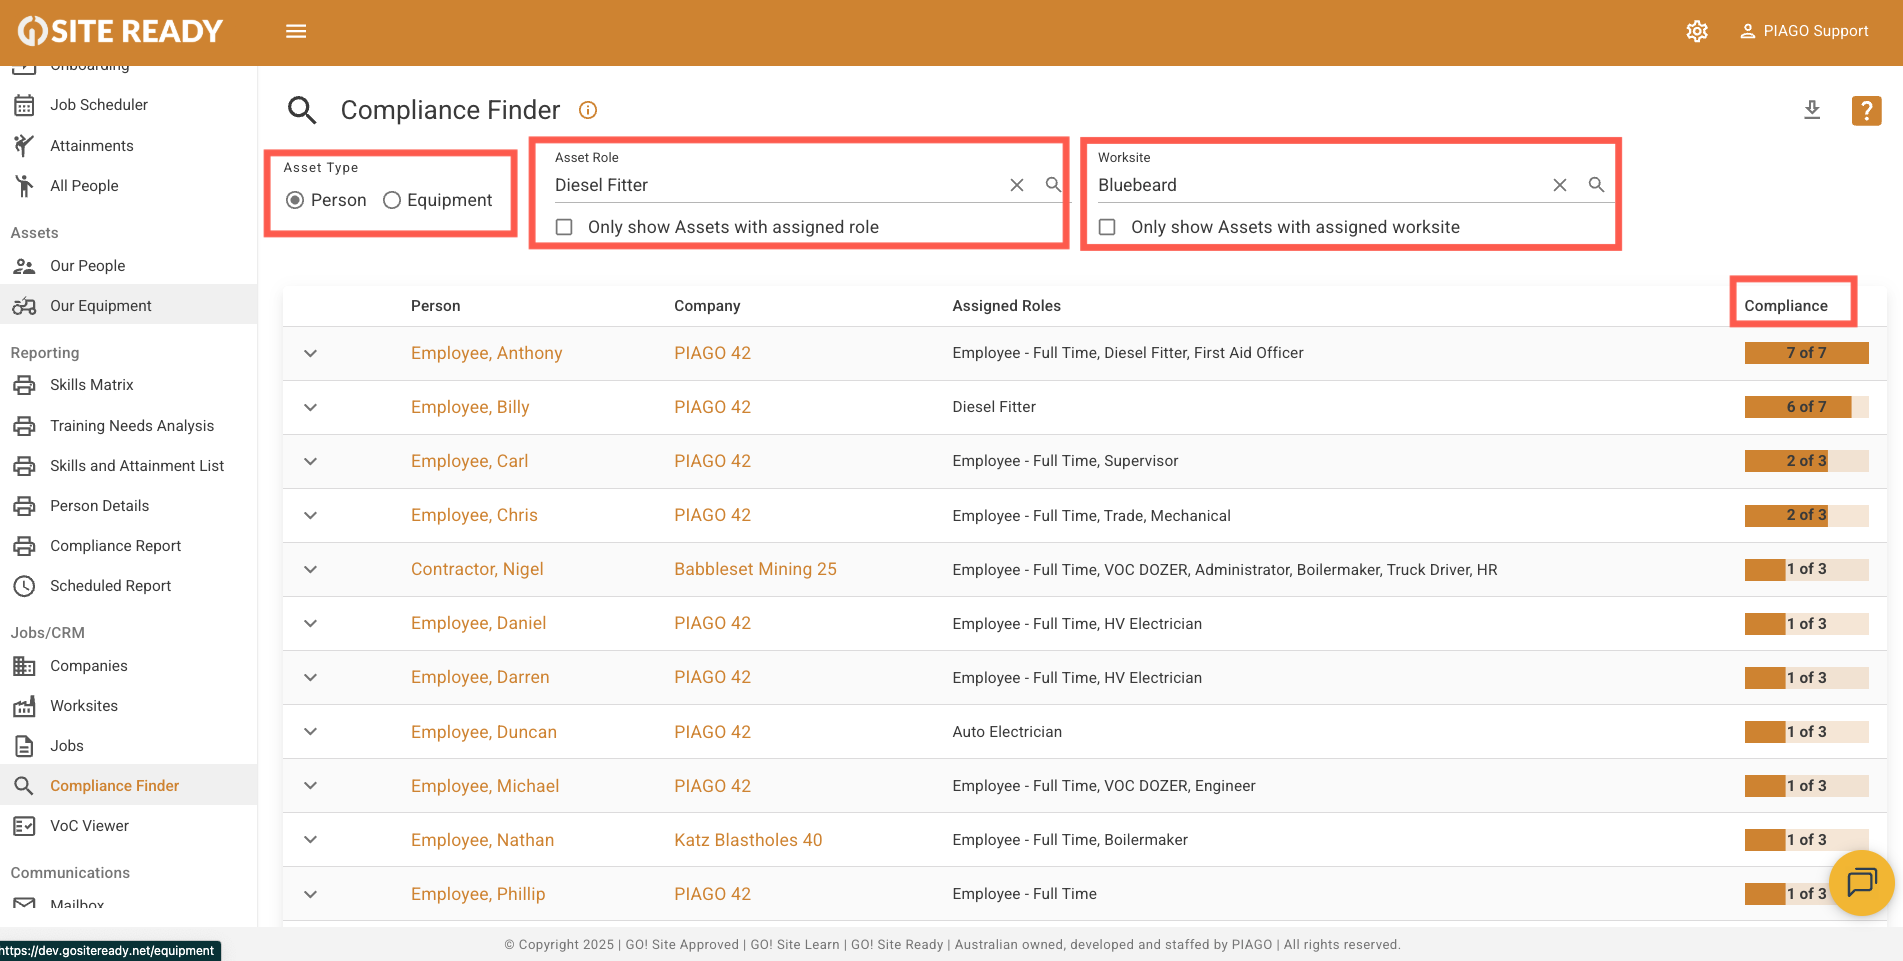
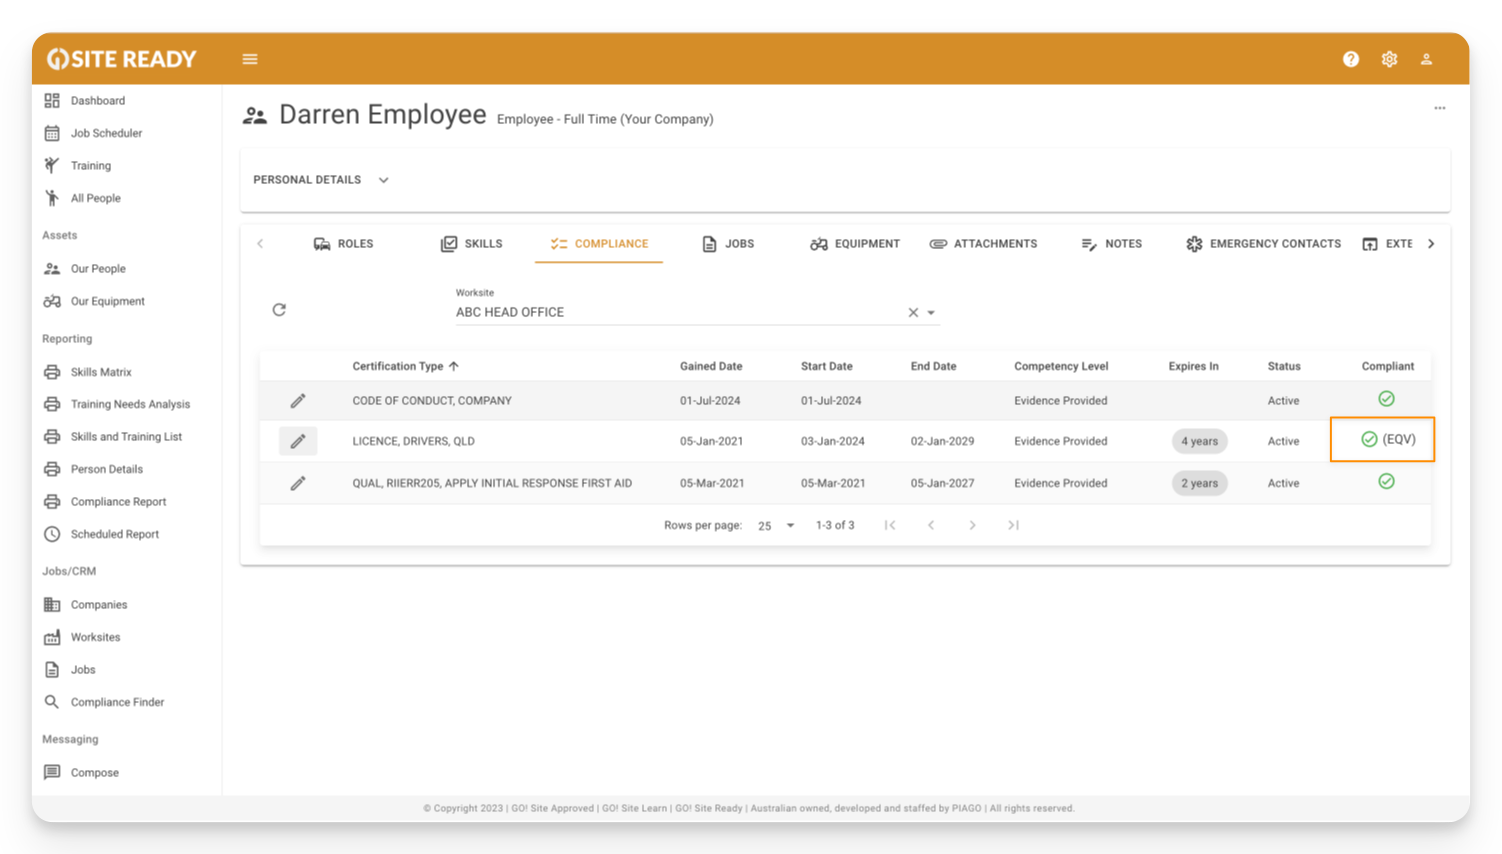
To implement this, start by identifying every attainment required to get through a site gate and set tiered alerts at 30, 14, and 7-day intervals based on the actual lead time needed for renewals.
Ensure you include company-level “umbrella” insurances like Workers Compensation to prevent site-wide lockouts, and assign these notifications directly to the person with the power to fix them, such as the Workshop Manager or Compliance Officer.
Finally, keep your system clean by only alerting on items that impact money or site access, allowing you to manage by exception rather than manual spreadsheet checks.

To see the history of reports, alerts, and messages sent from the system, navigate to Communications and open the Mailbox. You can click the eye icon next to any entry to view the specific history and content of that correspondence.

A yellow information icon indicates that the system did not send emails to certain recipients. This occurs when a recipient has been archived or terminated in the system. The Mailbox automatically prevents outgoing communication to inactive profiles to maintain accurate records.

Pick the report based on the question you need answered. This ensures you get exactly the right detail or summary, sent automatically if you schedule it.
Use this quick guide:
Skills Matrix
Training Needs Analysis (TNA)
Skills & Attainments List
Person Details
Compliance Report
Tip: If you need a high-level “who’s compliant” view, start with Compliance Report or TNA. For summaries by skill, use Skills Matrix. For audit-grade detail, use Skills & Attainments List. For contact/admin tasks, use Person Details.
Scheduled Reports automatically deliver key insights to inboxes on a cadence you choose. This saves you time, keeps stakeholders informed, and ensures compliance and training gaps are tracked without manual downloads.
Do this:
Set it once—reports arrive automatically with the latest data.
GO! Site Ready doesn’t have a “two-way sync” where documents automatically push into those third-party portals. What we do have is External Identifiers, which cuts the cross-system friction significantly. Instead of logging into the other system, searching for a worker, and then navigating to their profile, you store “Joe’s” unique profile URL — or even the specific attainment upload page URL — directly inside his GO! Site Ready record.
How that looks in practice: Joe gets a new ticket. It needs updating across Glencore (Ideagen), a Client B (Avetta) site, and a Client C (Pegasus) site:
It eliminates the “search and find” loop for each person in each portal.
The Job Schedule for a worker is a personal calendar that displays only their own assigned jobs. Unlike the administrator’s view, which shows the entire team’s schedule, this page is focused solely on the individual worker’s upcoming tasks.
This simplified view helps workers stay organised by allowing them to:

No, the Worker Dashboard is a simplified, personal view designed to show only the job information that matters to that specific worker. It does not show the company-wide compliance data that administrators see. Instead of the full administrator overview, a worker’s dashboard is focused on their personal schedule and includes four main sections:

Yes, an employee with a Worker login can add an extra layer of security to their account called Two-Factor Authentication (2FA). This helps make sure that only they can log in, even if someone else knows their password.
Here’s how to set it up:
After you set up 2FA, you will be shown a list of recovery codes. These are extremely important! Think of them as single-use backup keys. If you ever lose your phone or can’t access your authenticator app, you can use one of these codes to log in. You must copy these codes and save them in a very safe place (like a password manager or a printed document). Each code can only be used once.

Someone with a login as a ‘Worker’ can change their password at any time right from their account. It’s a quick and simple process:

If you have employees with Worker profiles they can easily manage their own account details directly within the GO! Site Ready.

A clean, task‑focused dashboard that shows today’s job, what’s next, and the week at a glance.
* Their personal details (photo/initials, email, phone).
* Everything a worker needs is front and centre — keeping distractions low and productivity high.
* Workers get clarity at a glance, fewer missed shifts, and faster access to support when they need it.
You can create new user logins for your team from the Users administration page. This process allows you to set up accounts with specific access levels for both Administrators and Workers.

The Profile Attachments Tab (Your Digital Filing Cabinet) Use this for general documents that belong to the person, not a specific skill. Think of this as the “HR Folder” for things like profile photos, signed employment forms, and performance reviews.
The Attainment Attachments (Your Evidence Vault) Use this for the “Proof of Paperwork.” This is where you attach the actual copy of a license, ticket, or certificate directly to the specific attainment so it’s ready for an instant compliance check.
Quick Rule of Thumb:
To add, update, or delete a profile photo for a team member, follow these simple steps to pull a rabbit out of your hat and get that profile looking sharp:

An Identifier is the unique ’name tag’ you give to every piece of equipment in GO! Site Ready. It is a mandatory field that ensures every item, from a power drill to a dump truck, can be uniquely tracked—especially those without a serial number.

In the Job Scheduler, locate the 3 dot menu next to your rostered staff. Select Email Roster Schedule
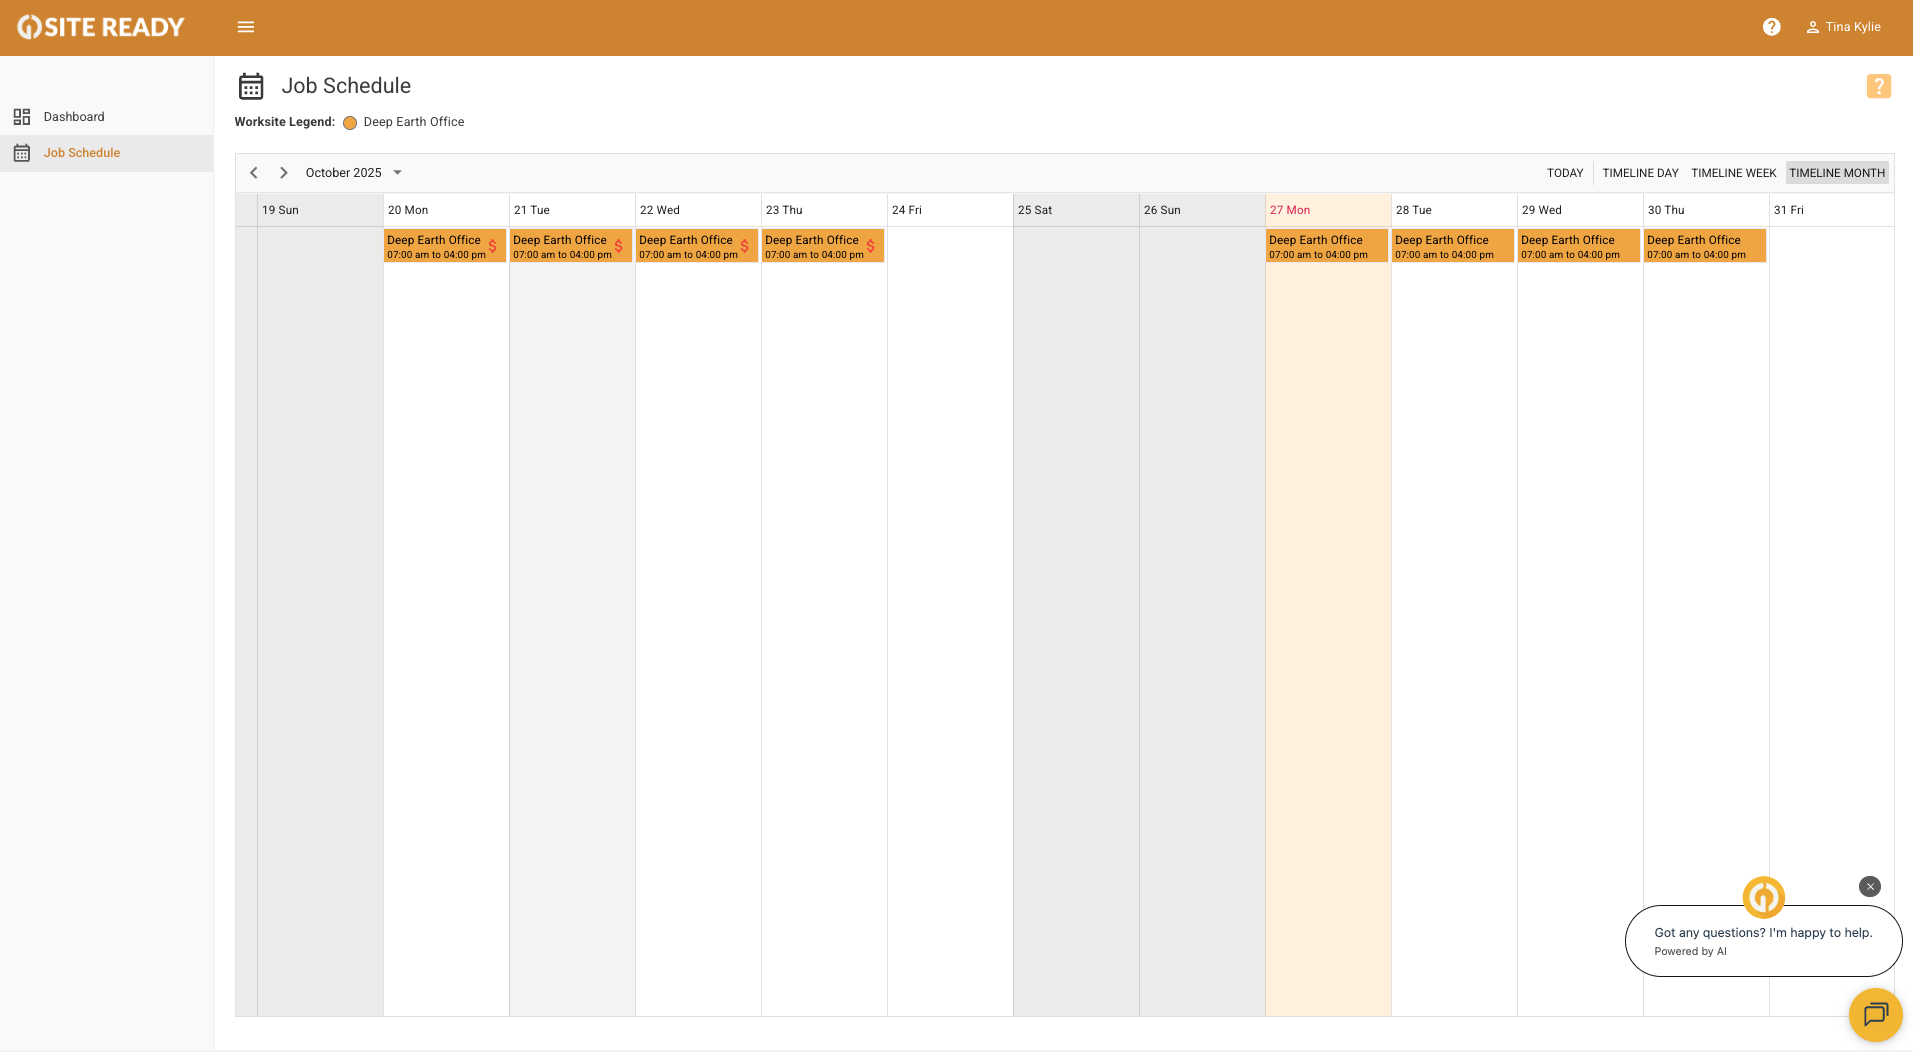
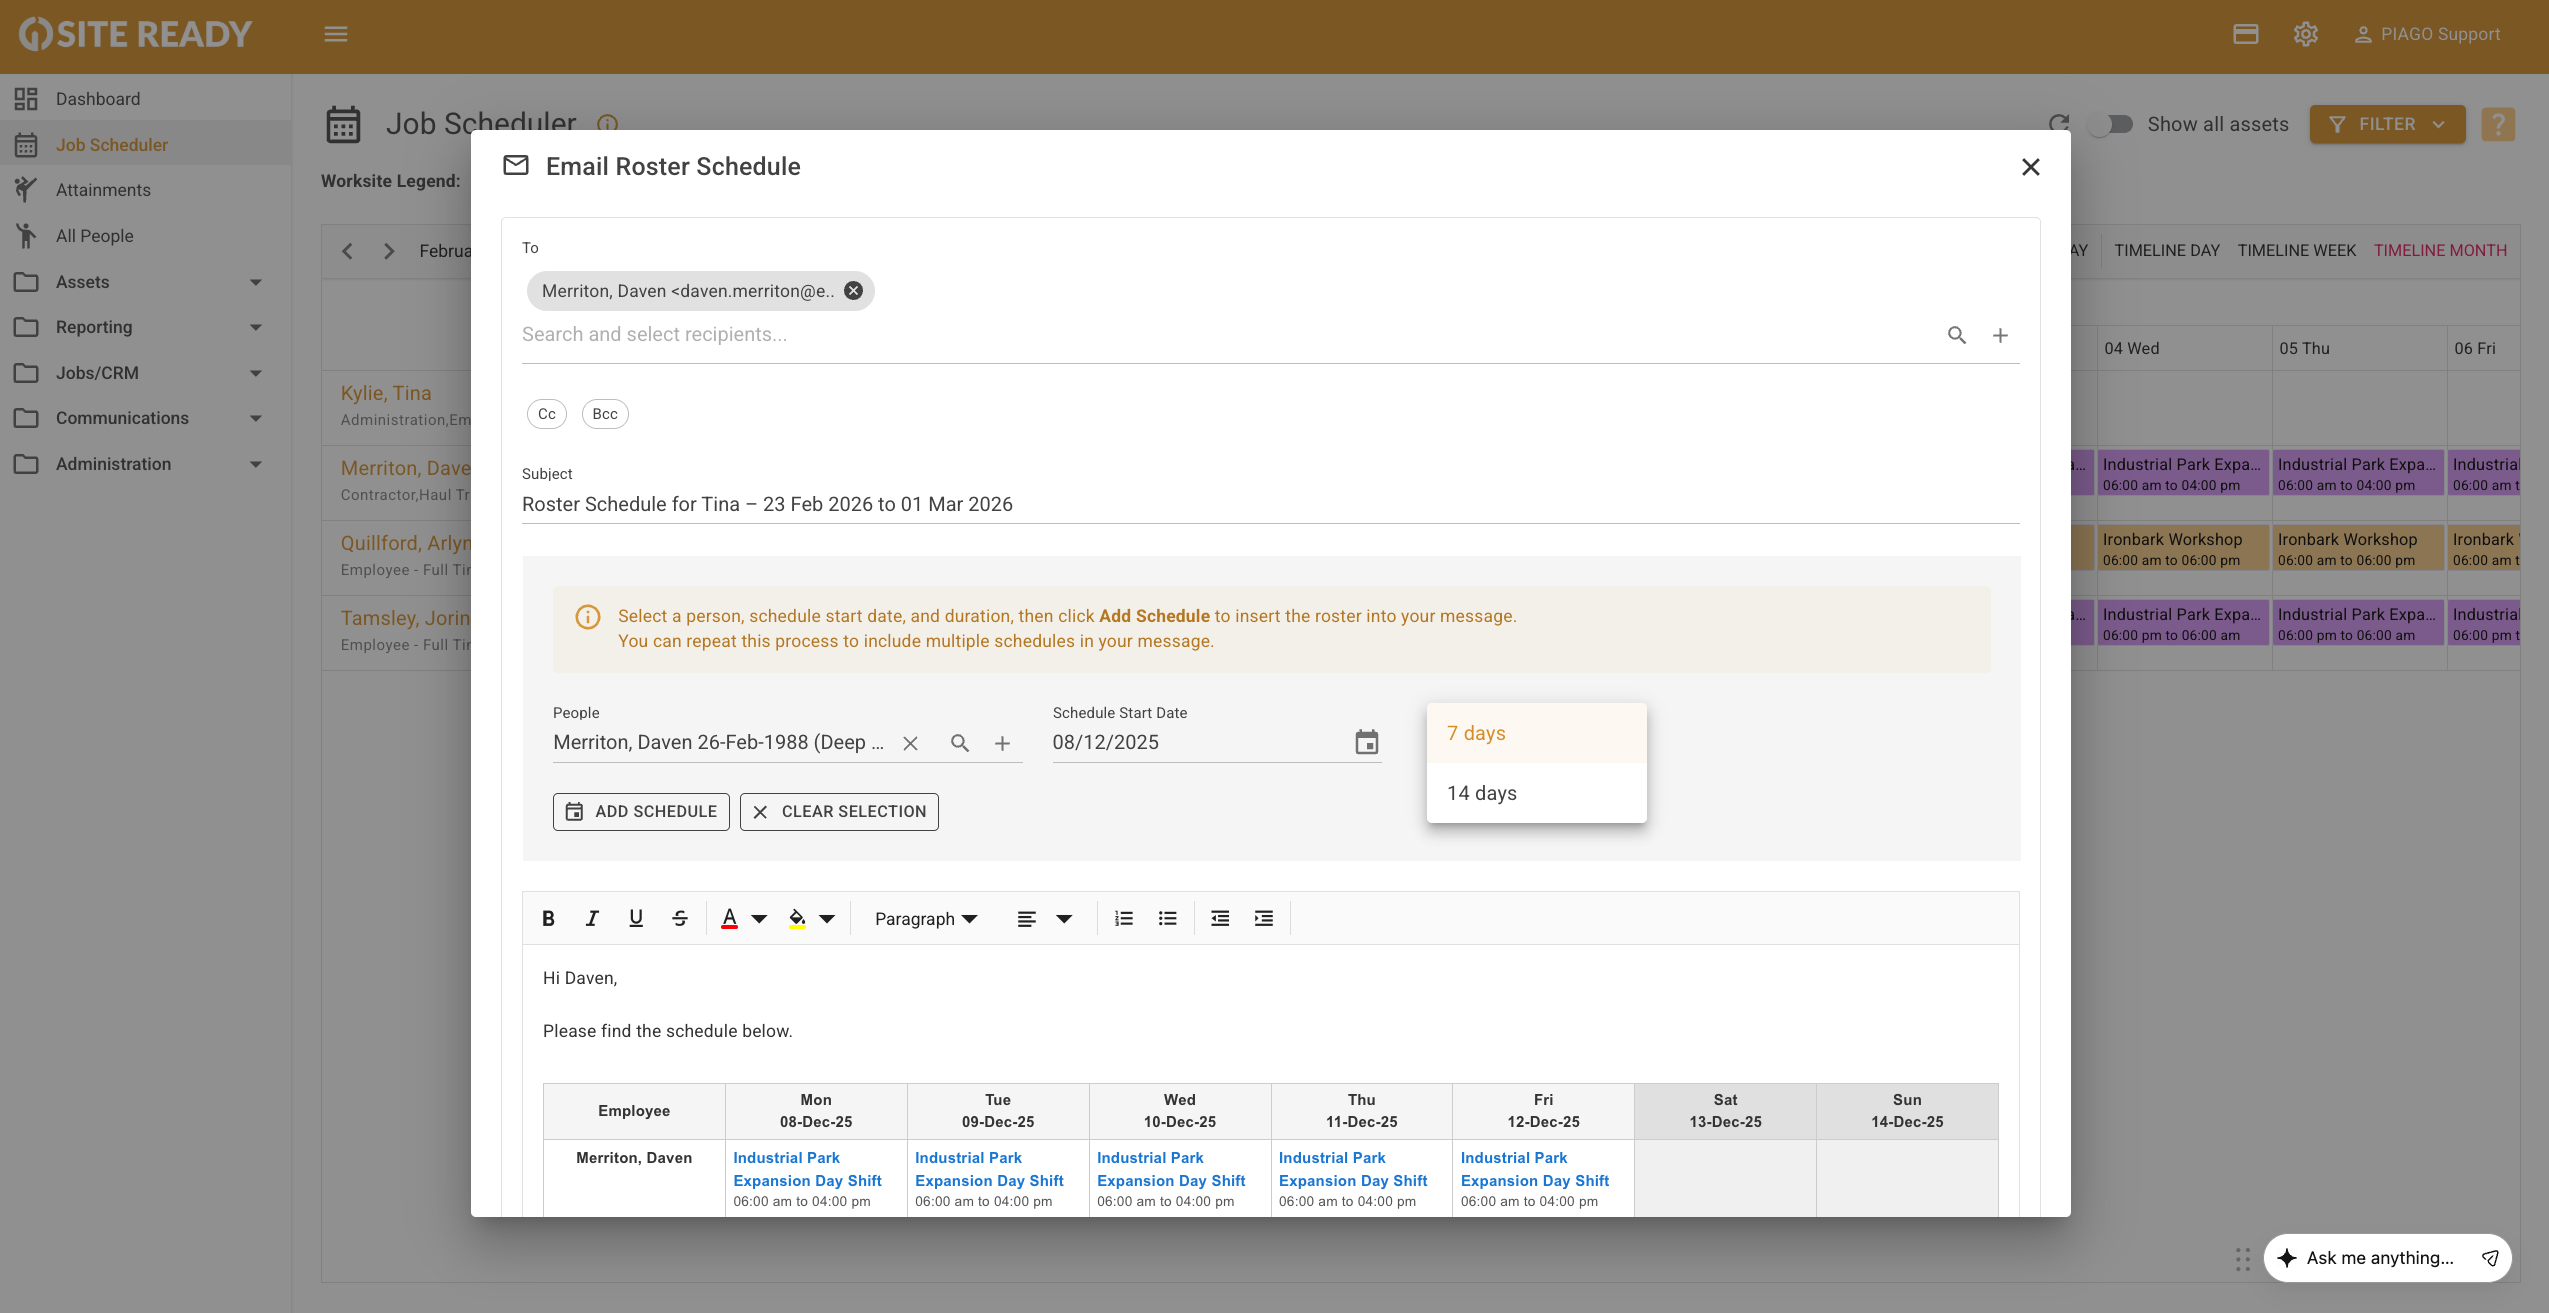
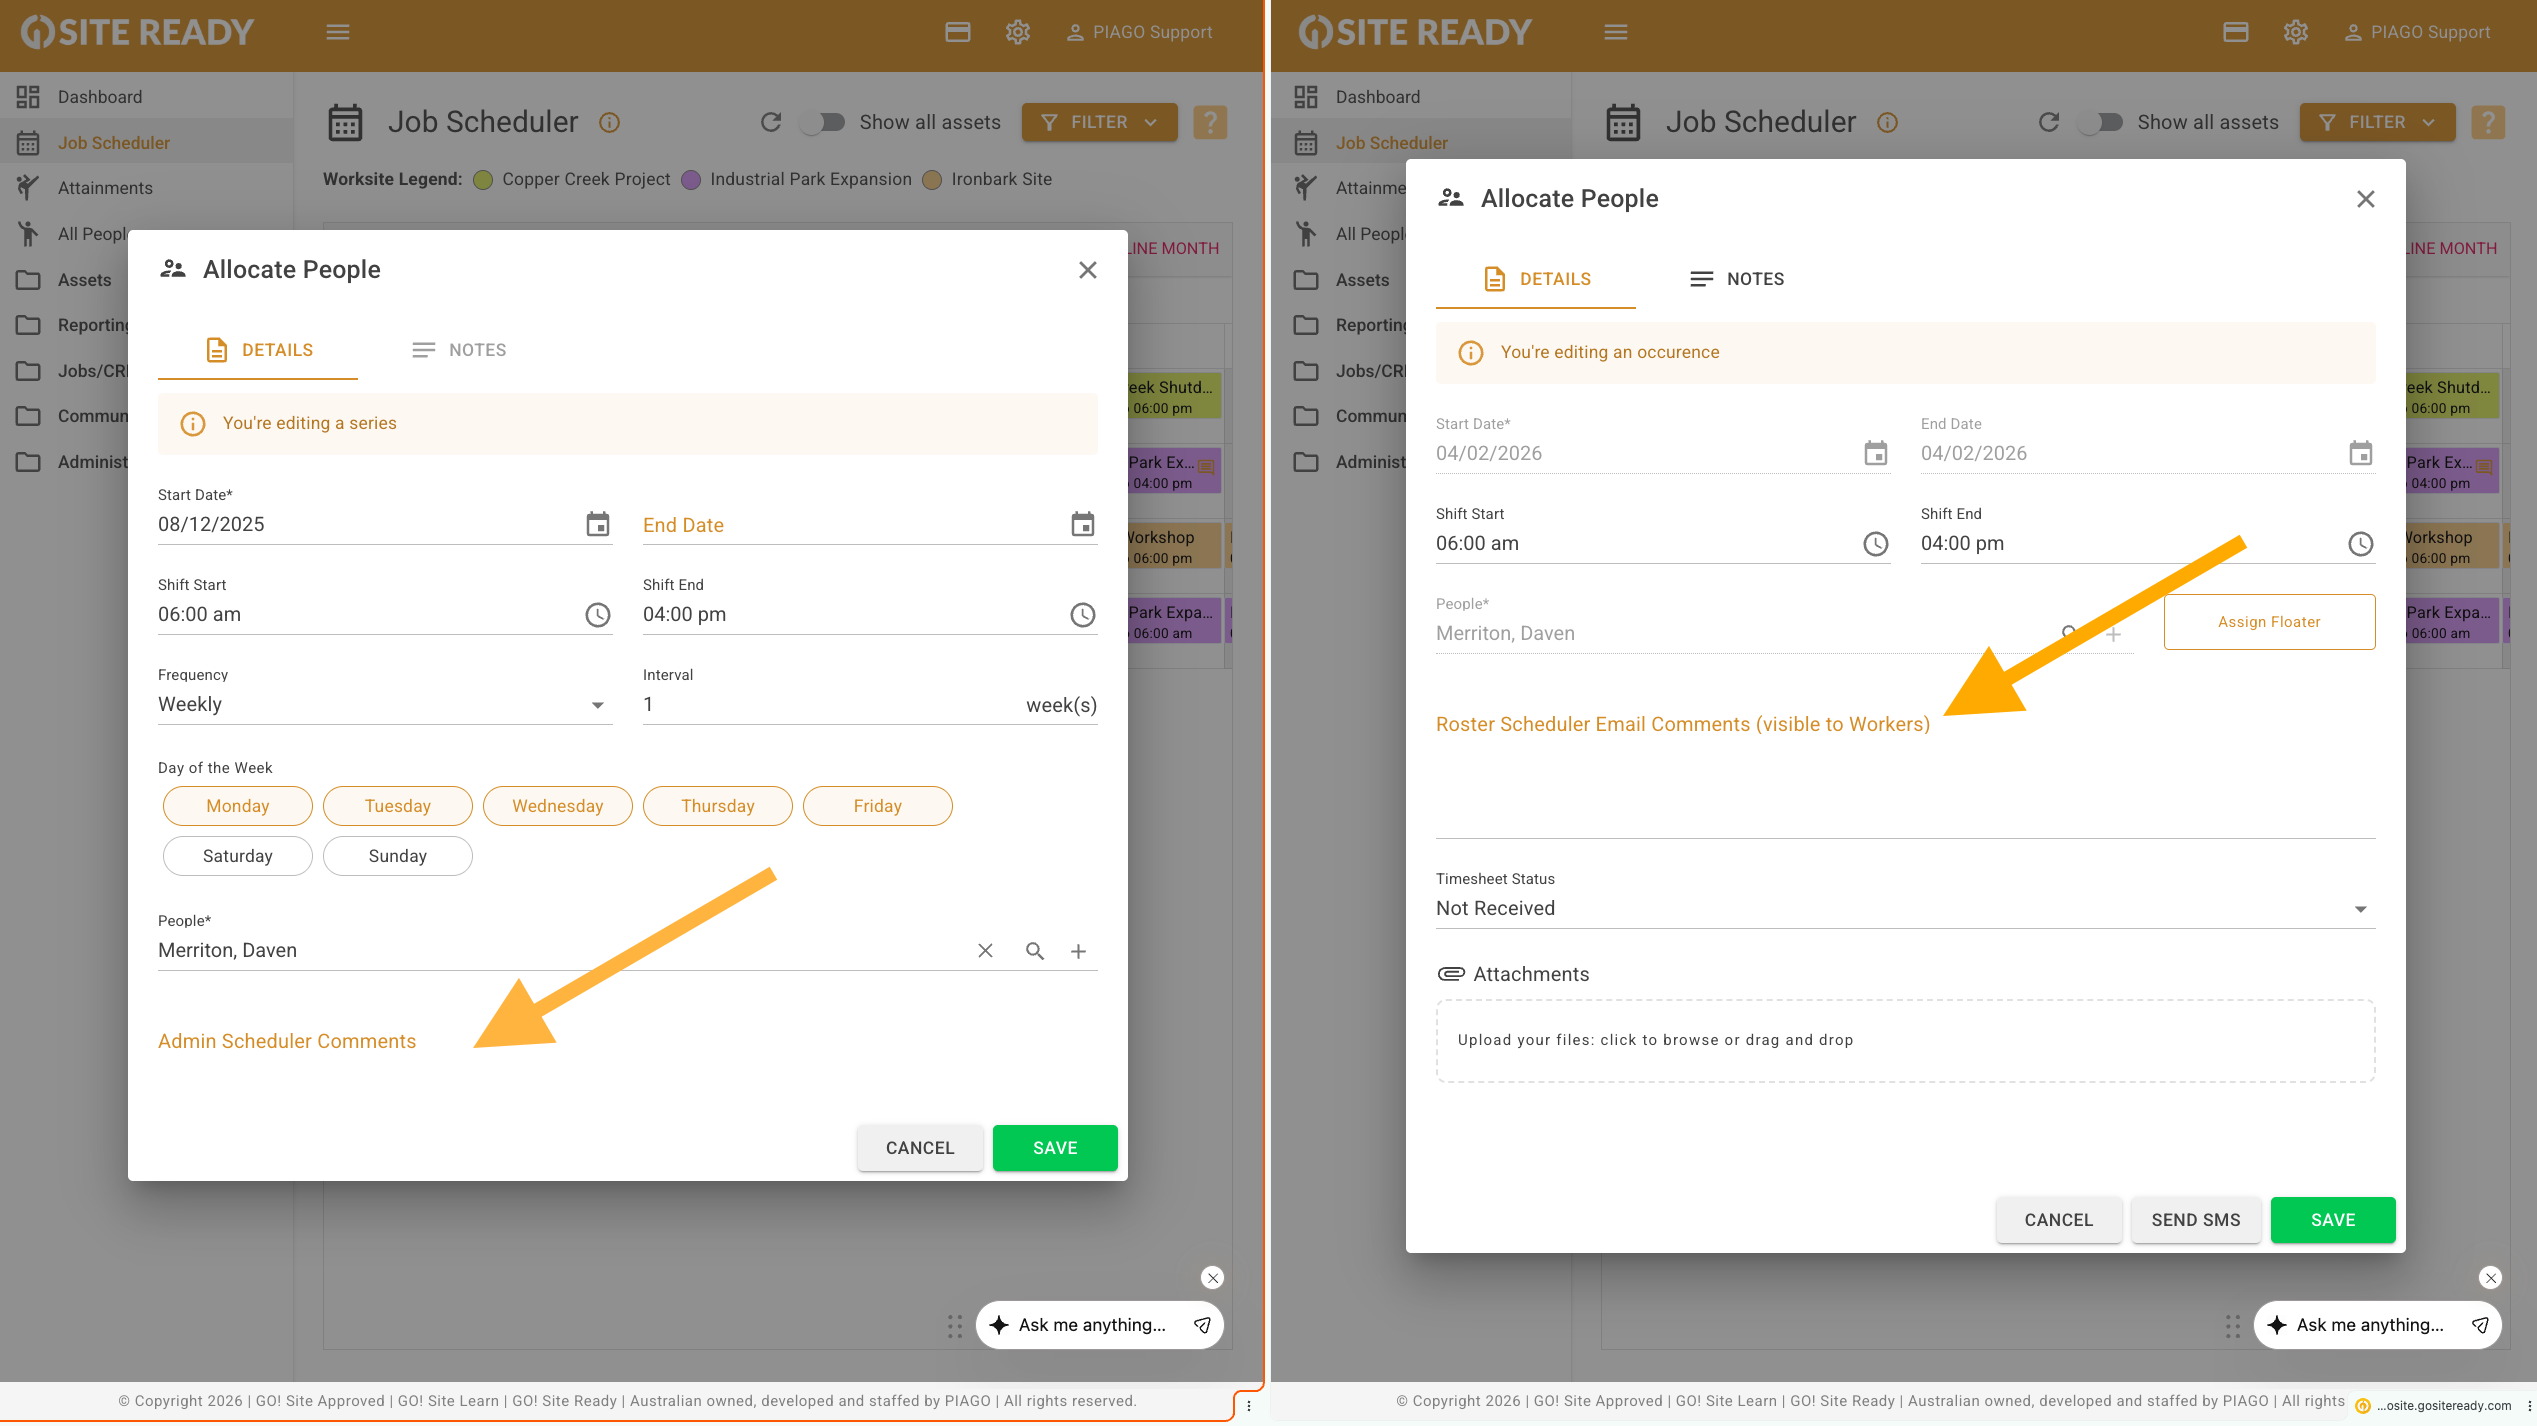
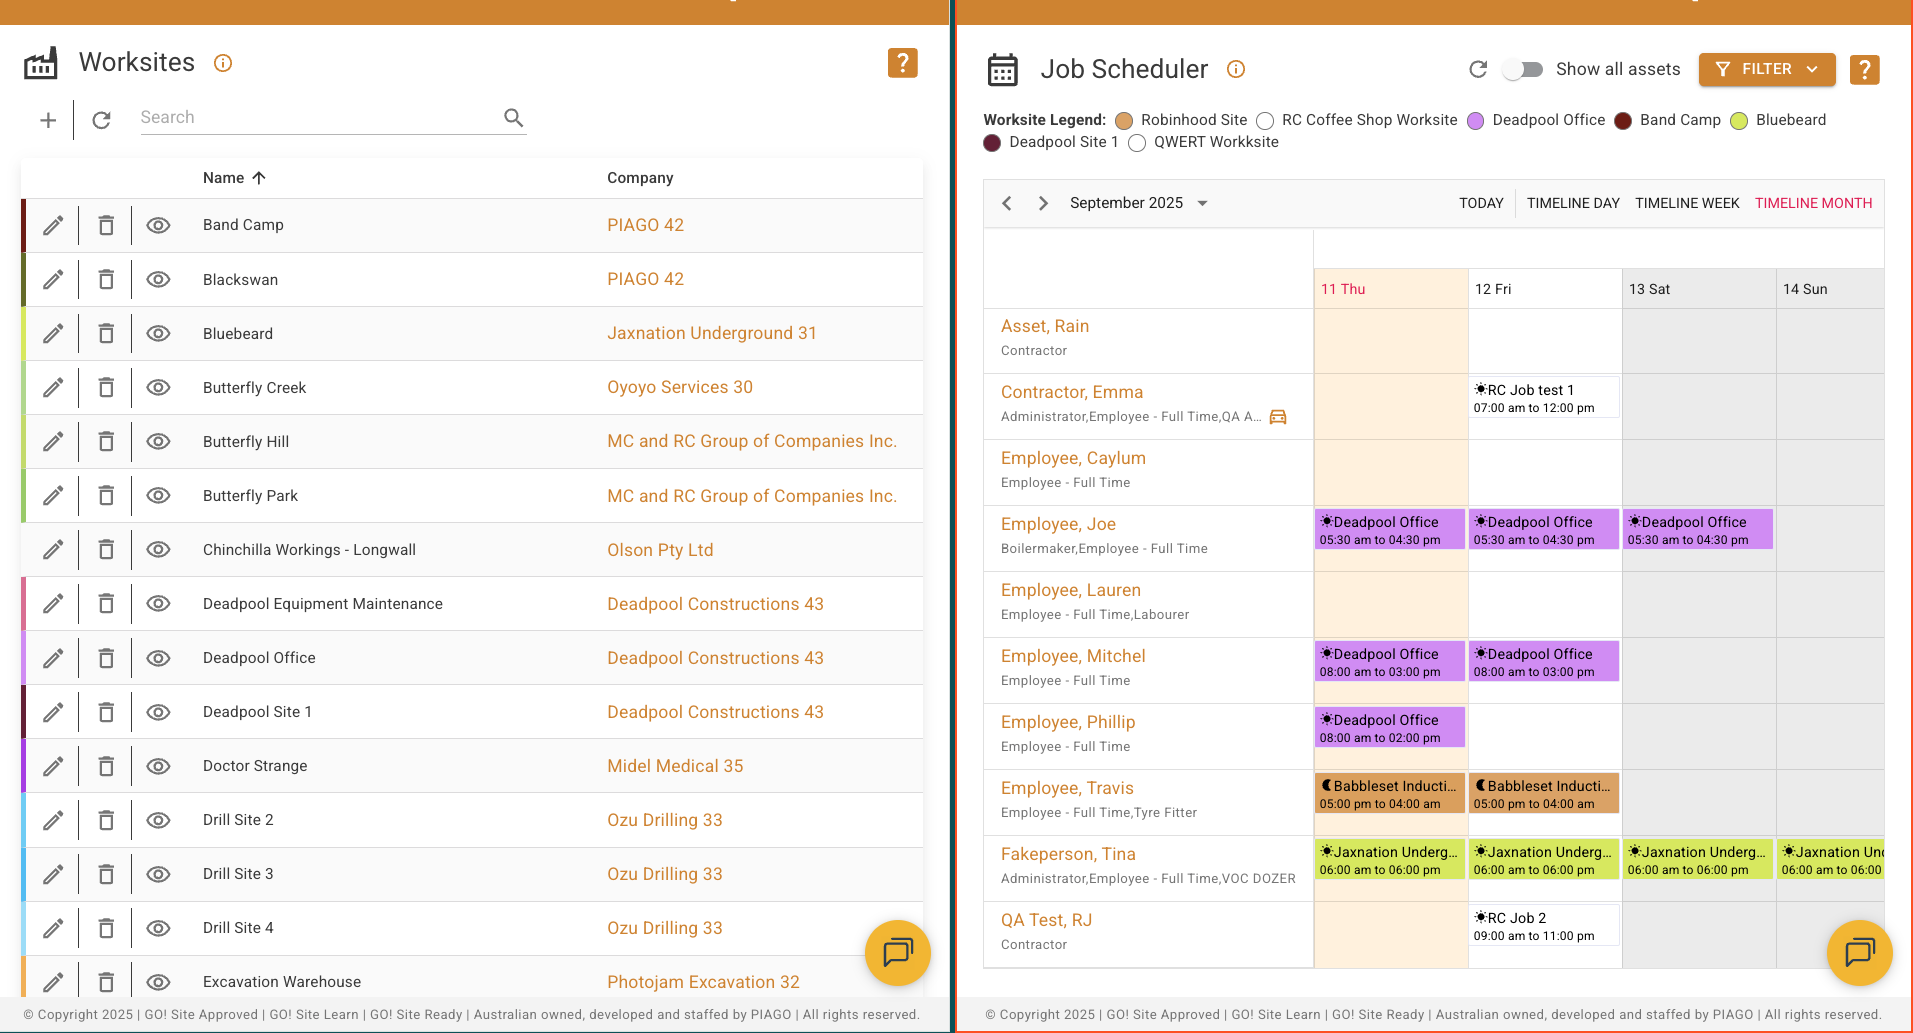
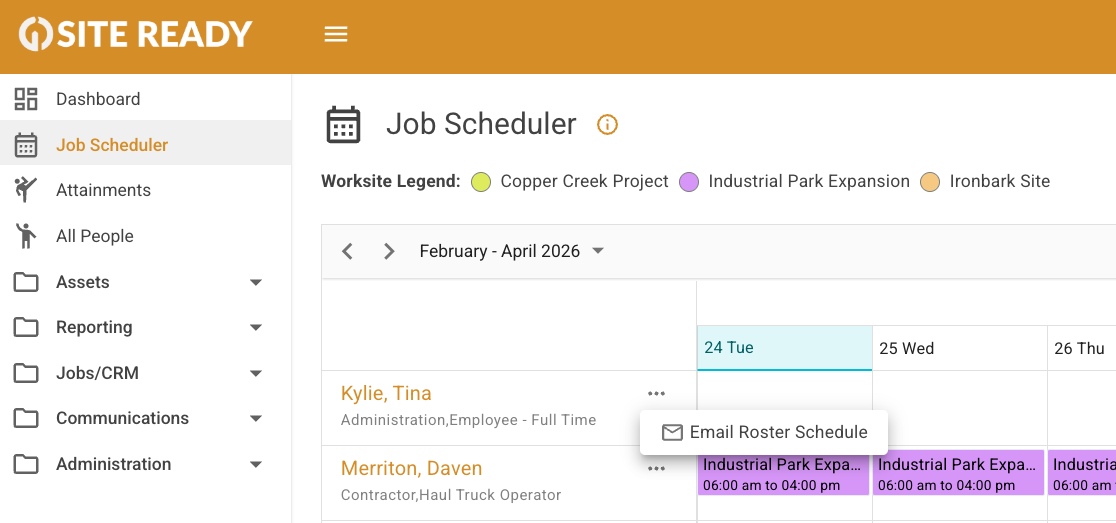
Fields will be pre-populated, but you can edit them as needed. Choose either a 7 or 14-day schedule, then click Add Schedule. The roster will appear in the email section, where you can add any additional information before clicking Send.

You can modify a single shift without affecting the rest of the job series. This is useful for one-off time changes, site moves, or specific shift notes while keeping the overall pattern intact.
To edit a single occurrence:
If you need to update every future and past instance of a job, choose Edit Job Schedule > Edit Series instead of editing the occurrence.

Timesheets are monitored through the Job Scheduler to allow admins to track the status of each shift for payroll purposes. Please note that GSR is currently used for monitoring submissions only; workers do not submit their timesheets directly through the platform.
To update the status of a specific shift:
The dollar sign ($) icon on a shift indicates its current progress:

We have moved from a single comment field for a job series to a more granular system. To support specific comments for individual shifts. Worker-facing comments are now managed at the occurrence level rather than the series level.
While admin scheduler comments remain in the Series view, worker-facing comments have moved. You must now navigate to the specific Occurrence to add or edit comments for that individual’s shift.


Your dashboard widgets give a live, at‑a‑glance view of compliance and activity across people, equipment, and companies. They help you spot expiring items, workforce status, and training gaps fast—so you can jump straight to the right screen and take action in one click.
Here’s how they work:
Attainment Records
Our People
Our Equipment
Training Needs Analysis (TNA)
The Job Scheduler page is your visual, interactive calendar for assigning and managing jobs for your team. It gives you a clear overview of who is scheduled for what, where, and when.
From this page, you can perform several key actions:

The All People page is your complete directory for every person in your system, combining both your internal staff and external contacts into one master list.
It’s where you manage two distinct types of people:
From this page, you can:

The Attainments page is your quick-view hub for managing all the certifications, skills, and qualifications held against your people and equipment.
Its main purpose is to help you stay on top of compliance. By default, the page automatically sorts to show the most recently expired records first, so you always know what needs immediate attention.
Use it to:

Your Dashboard is the live command centre for your business’s compliance. Here’s what you need to know in a nutshell:
* Welcome and Getting Started videos make it easy to learn your way around GO! Site Ready.
* Attainment Records: Live counts for People, Equipment, and Companies. Each number is a hyperlink that opens the matching filter in the Attainments tab.
* Instant visibility and one‑click drill‑downs help you act fast on what matters—without hunting through menus.

Timesheets are managed from the Job Scheduler so payroll can track each shift’s status at a glance. This matters because the icon and its colour show progress: red = Not Received, orange = Submitted, green = Actioned. No icon means the shift is in the future or timesheet is set to Not Required.
Do this:
Notes:
The Job Scheduler is your live calendar for all jobs assigned to people or equipment. It gives you a clear picture of who/what is working where and when, so you can plan fast, action changes, and keep everyone informed without digging through multiple pages.
Here’s how to use it:
See assigned work at a glance
Navigate your schedule
Filter to what matters
Make changes quickly
Keep your team in the loop
Tip: Create jobs and assign them first—only assigned jobs appear in the scheduler.
GO! Site Ready calls tasks “Jobs.” First you create the job, then you assign people to it. This keeps work organised, lets you schedule shifts and frequencies, and ensures the right person is booked on the right work with clear dates and notes. Assigning people correctly makes rostering faster and keeps your Job Scheduler accurate.
Here’s how:
The VoC Viewer provides a centralised, all-in-one list of every person who has an in-progress Verification of Competency (VoC).
Its main purpose is to give you a master view of everyone’s status at a glance, so you don’t have to check individual profiles one by one.
While you can manage these details from within a person’s profile, this page is the ideal command centre for trainers and assessors to:

You use the Compliance Finder to get an instant answer to a critical question: “Is this person or equipment compliant for this specific job right now?” It’s designed for quick, on-the-spot checks, like daily readiness assessments or finding a last-minute replacement.
By selecting a Worksite and an Asset Role, the page generates a live list of all matching people or equipment. For a more focused search, you can tick the checkboxes to only show assets already assigned to that role or worksite. The list is automatically sorted to show you the most qualified and compliant assets at the very top.
From that list, you can expand any record to see a detailed breakdown of their status against every single requirement, giving you both a quick answer and the detailed proof to back it up.

In GO! Site Ready, a Worksite is a required field for many key functions, especially the Job Scheduler. It’s the “where” for any job you create.
Even if you don’t have a physical construction site, you should create Worksites for other operational “locations.” Think of them as categories for your work.
Common examples include:
This setup is crucial for scheduling, tracking compliance, and accurate reporting.
It’s a simple parent-child relationship in the system:
Every Company in the system needs at least one Worksite associated with it.
A Job is any event or task you want to display on the Job Scheduler, assigned to a specific person or piece of equipment.
It’s a completely flexible feature. A ‘Job’ can be a standard work shift, or it can be used to track other important events like:
See who is where in a heartbeat!
This gives you an “at-a-glance” understanding of your resource allocation.

No! You can use the Onboarding Wizard anytime—not just at first setup. It’s designed to speed up bulk changes so your data stays clean and current without manual entry. Using it for updates saves time, reduces errors, and keeps dashboards, TNA, and scheduling accurate.
How to use it for ongoing updates:
Tip: Reach for the wizard whenever it’s faster than adding items one-by-one.
It’s a guided importer that loads your core data into GO! Site Ready quickly and consistently. This matters because a clean, complete setup (people, equipment, sites, roles, skills, etc.) makes your dashboards, compliance, and scheduling accurate from day one.
Here’s how to use it:
What it brings in
Why it’s reliable
How to run it
Pro tips:
Creating your trial tenancy in GO! Site Ready is quick and fully guided. You’ll have your own secure, standalone version of the platform — so you can explore how it fits your business before making a commitment.
Here’s how to do it:
That’s it — your trial tenancy is live and ready for you to explore!
How do I cancel a Stripe subscription?
To cancel your Stripe subscription, follow these steps:
After cancellation, you’ll typically retain access until the end of your current billing period. If you have any issues or need help, contact support for assistance.
Once set up, Equivalent Skills (EQVs) are automatically considered in two key areas to give you a more complete view of your team’s compliance:


You can configure equivalents in the Skills library. Here’s the process:
Administration > Skills.Keeps TNA accurate and fair—automatically.

The Equivalent Skills feature allows you to make your compliance tracking more flexible by setting up acceptable substitutes for a required skill. It recognises that different qualifications can often meet the same requirement.
For example, if a role requires a ‘C Class Licence’, you can set a ‘Heavy Vehicle Licence’ as an equivalent. This means a person with a heavy vehicle licence will be considered compliant for that role, allowing you to better utilise the diverse skills of your workforce.

Once your VoC Asset Role is set up, you can assign it to your staff.
There are two convenient ways to do this:
Navigate to Administration > Asset Roles and open the VoC Role you want to assign. Go to the ‘People’ tab and add all the relevant staff members from there.
Go to the person’s profile page by navigating to Assets > Our People and selecting their name. Click on their ‘Roles’ tab and assign the VoC Asset Role to them directly.
As soon as a person is assigned the role, their VoC becomes active, and you can begin tracking and updating their progress in the VoC Viewer or their profiles.

After you have created your VoC Parent and Child skills in the Skills library, the next step is to package them into an Asset Role. This allows you to formally assign the VoC to your people and track it within your Training Needs Analysis (TNA).
Your VoC Asset Role is now complete. You can assign this role to your team members.

Setting up a VoC in the Skills library involves creating a main container (the Parent skill) and then linking your individual checklist items (the Child skills) to it. Here’s the process:

Setting up your TNA involves four main stages, from creating your requirements to seeing the results.
This is the foundation. Navigate to Administration > Asset Roles to create your role templates (e.g., ‘Electrician’, ‘Light Vehicle’). Here, you will define the core skills your business requires for each role, regardless of location.
Go to a specific Worksite’s profile to add location-based skill requirements. You can set:
Once your roles and worksite requirements are built, assign the relevant Asset Roles to your people and equipment. You can do this from the Asset Role page or from within an individual’s profile.
Finally, ensure all existing qualifications and certifications are recorded in each asset’s personal Attainments library. This populates the “what they have” part of the analysis.
Once these steps are complete, GO! Site Ready automatically compares the requirements (what they need) with the recorded attainments (what they have) to show you the compliance gaps in real-time.
A Training Needs Analysis (TNA), also known as a Required Skills Matrix, is a tool for defining all the specific skills, qualifications, and certifications required for a particular role. In GO! Site Ready, you can set up a TNA for employee job roles (like ‘Electrician’ or ‘Operator’), equipment roles (like ‘Light Vehicle’ or ‘Dozer’), and specific Worksite requirements (both Core & Role Specific).
Setting up a TNA is the foundation for proactive compliance management. It allows you to:
GO! Site Ready makes it easy to:
When you add a skill requirement to an Asset Role, you need to classify its importance. This helps you prioritise training and understand compliance gaps at a glance.
These are non-negotiable requirements, often needed to meet legislative or critical safety standards. An asset is not considered compliant for the role without these skills.
These skills are considered essential for the role by your organisation but are not legally mandated. They are key to performing the job effectively and to a high standard.
These are desirable skills that add value but are not essential for day-to-day duties. Think of them as a bonus qualification.

The TNA provides a powerful and flexible way to manage compliance by letting you define skill requirements at three distinct levels:
The system checks an asset’s skills against all three levels to determine their true compliance status for any given situation.

Once your TNA is configured and roles are assigned, the results automatically appear in several key areas across the platform:
Not sure whether to Archive or Quarantine a competency? Here’s the simple difference:
Use this for competencies you’re done with for good.
Use this for competencies you just need to pause for a while.
Your System, Your Rules. Use them in the way that best suits your operation!

In GO! Site Ready, a ‘Skill’ is any qualification, licence, certification, or training you need to track. The Skills page is your central library where you create these items, such as a Driver’s Licence for a person, a Roadworthy Certificate for equipment, or a WorkCover Policy for a company.
They are the essential building blocks of your entire compliance system. By creating a skill here first, you can then assign it to people, equipment, or worksites to track their compliance, ensuring everyone and everything is qualified and ready for work.
If you receive an error message or notice the system is not behaving as it normally does—such as a field not accepting data or a feature missing from its usual spot—please contact GO! Site Ready support immediately. To help us resolve the issue quickly, please take note of:
While Gazza is designed to provide guidance and help you navigate the platform, it cannot view system-level errors or diagnose configuration bugs. Providing the URL and your current task directly to our support team is the fastest way to get you back up and running.
If you’ve encountered a bug or a technical problem that isn’t solved by our help resources, our support team is here to help.
You can reach us in two ways:
Providing these details helps our team diagnose and resolve your issue much faster.
GO! Site Ready has several built-in tools to help you find answers quickly and easily. Before reaching out, we recommend checking these resources first.

No dramas. If our guides haven’t quite hit the mark, our support team is ready to help. Lodge a ticket with your question and we’ll get right on it for you.